Deployment Guide
To quickly experiment with fidesops, it's easiest to clone the source repo and use the built-in docker compose configuration to get a fully working demo environment up and running. However, when you want to use fidesops in production, you'll want to deploy it in parts, leveraging whatever cloud infrastructure your organization is most familiar with.
Fully deployed, fidesops has three individual systems you'll need to run:
- Hosted Database: PostgreSQL database server used for permanent storage of configuration data for the web server
- Hosted Cache: Redis database server used as a temporary cache during execution and scheduling of tasks
- fidesops Web Server: Main application with API endpoints to configure, execute, and report on privacy requests
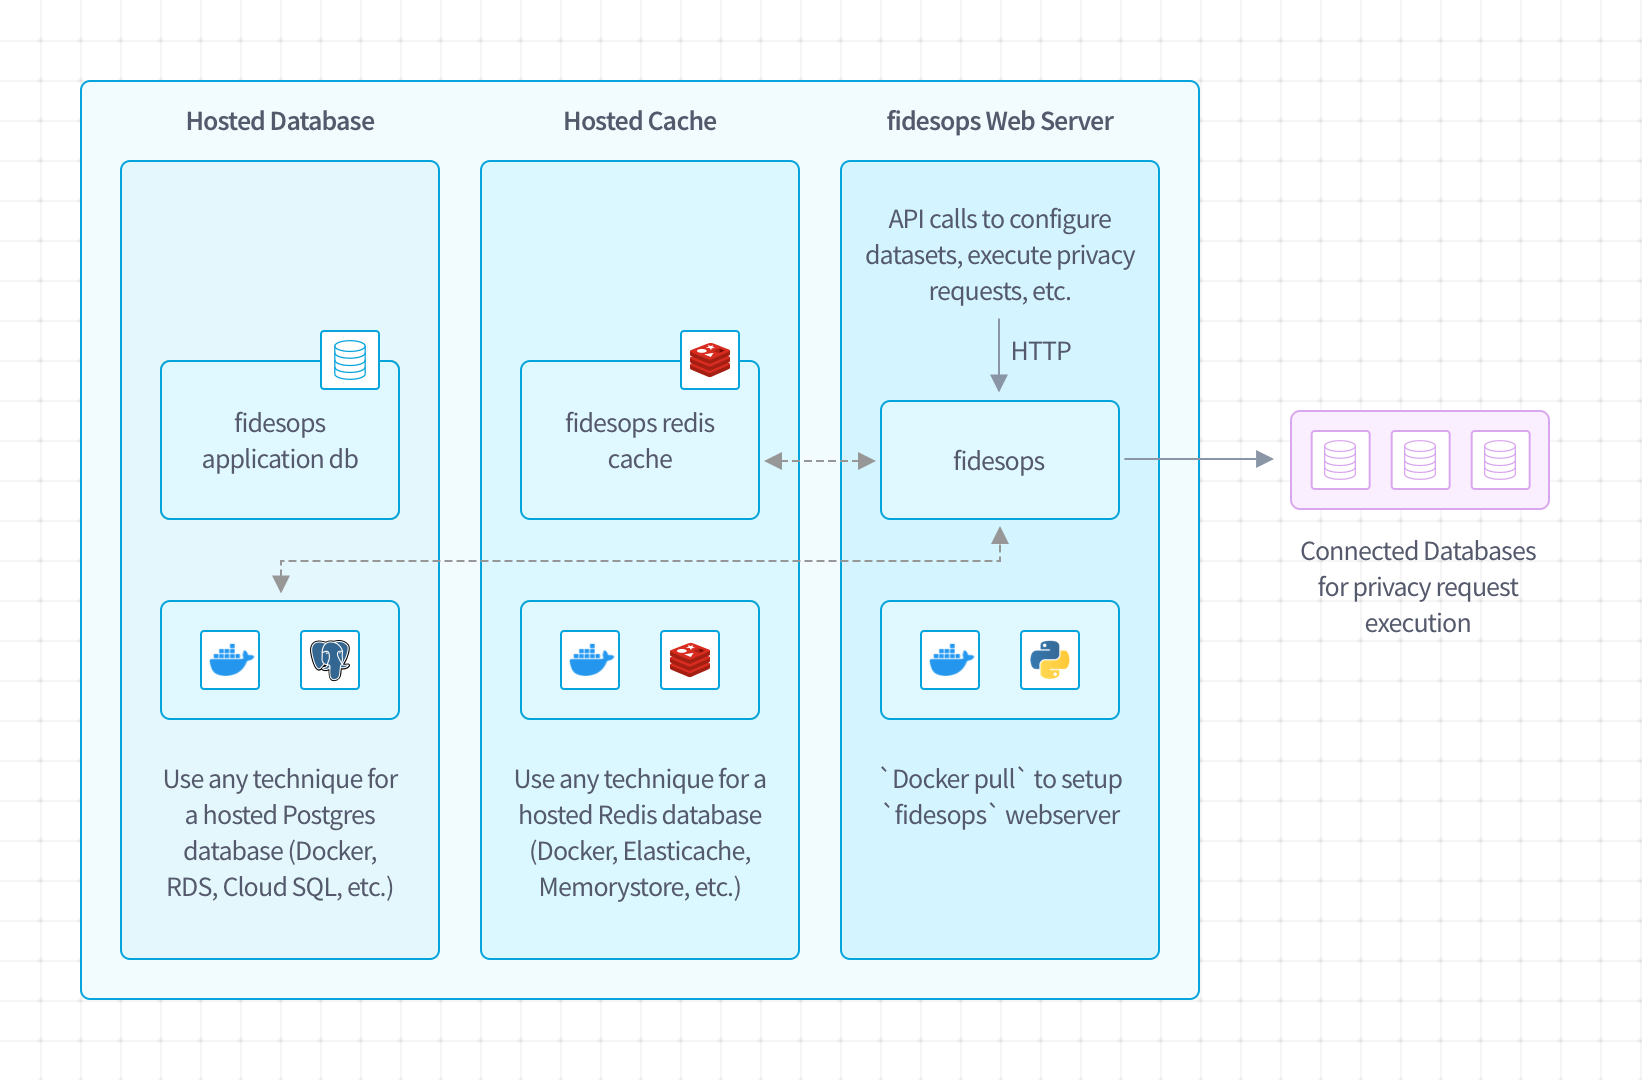
Optionally the frontend privacy center can be deployed as a pre-built way to handle privacy requests.
Let's review each individually.
Step 1: Setup Hosted Database
Like most web applications, fidesops uses an application database for persistent storage. Any hosted PostgreSQL database solution will work (PostgreSQL version 12+), as long as it's accessible. Good options include:
- Managed PostgreSQL database services (e.g. AWS RDS, GCP Cloud SQL, Azure Database)
- Self-hosted PostgreSQL Docker container with a persistent volume mount (e.g. on a Kubernetes cluster)
- Self-hosted PostgreSQL server (e.g. on an EC2 server)
NOTE: there is no reason to expose this database to the public Internet as long as it will be accessible by your fidesops web server!
Setting up a production-grade PostgreSQL database is likely something your team is already familiar with, so we won't revisit that here. Once it's up and running, make sure you create a unique user and database to use for fidesops (we recommended calling these both fidesops) and assign a secure password, then keep track of all those credentials. You'll need those values later to populate these configuration variables for fidesops:
| Config Variable | Example | Description |
|---|---|---|
FIDESOPS__DATABASE__SERVER |
postgres.internal | hostname for your database server |
FIDESOPS__DATABASE__USER |
fidesops | username fidesops should use to access the database |
FIDESOPS__DATABASE__PASSWORD |
fidesopssecret | password fidesops should use to access the database |
FIDESOPS__DATABASE__DB |
fidesops | database name |
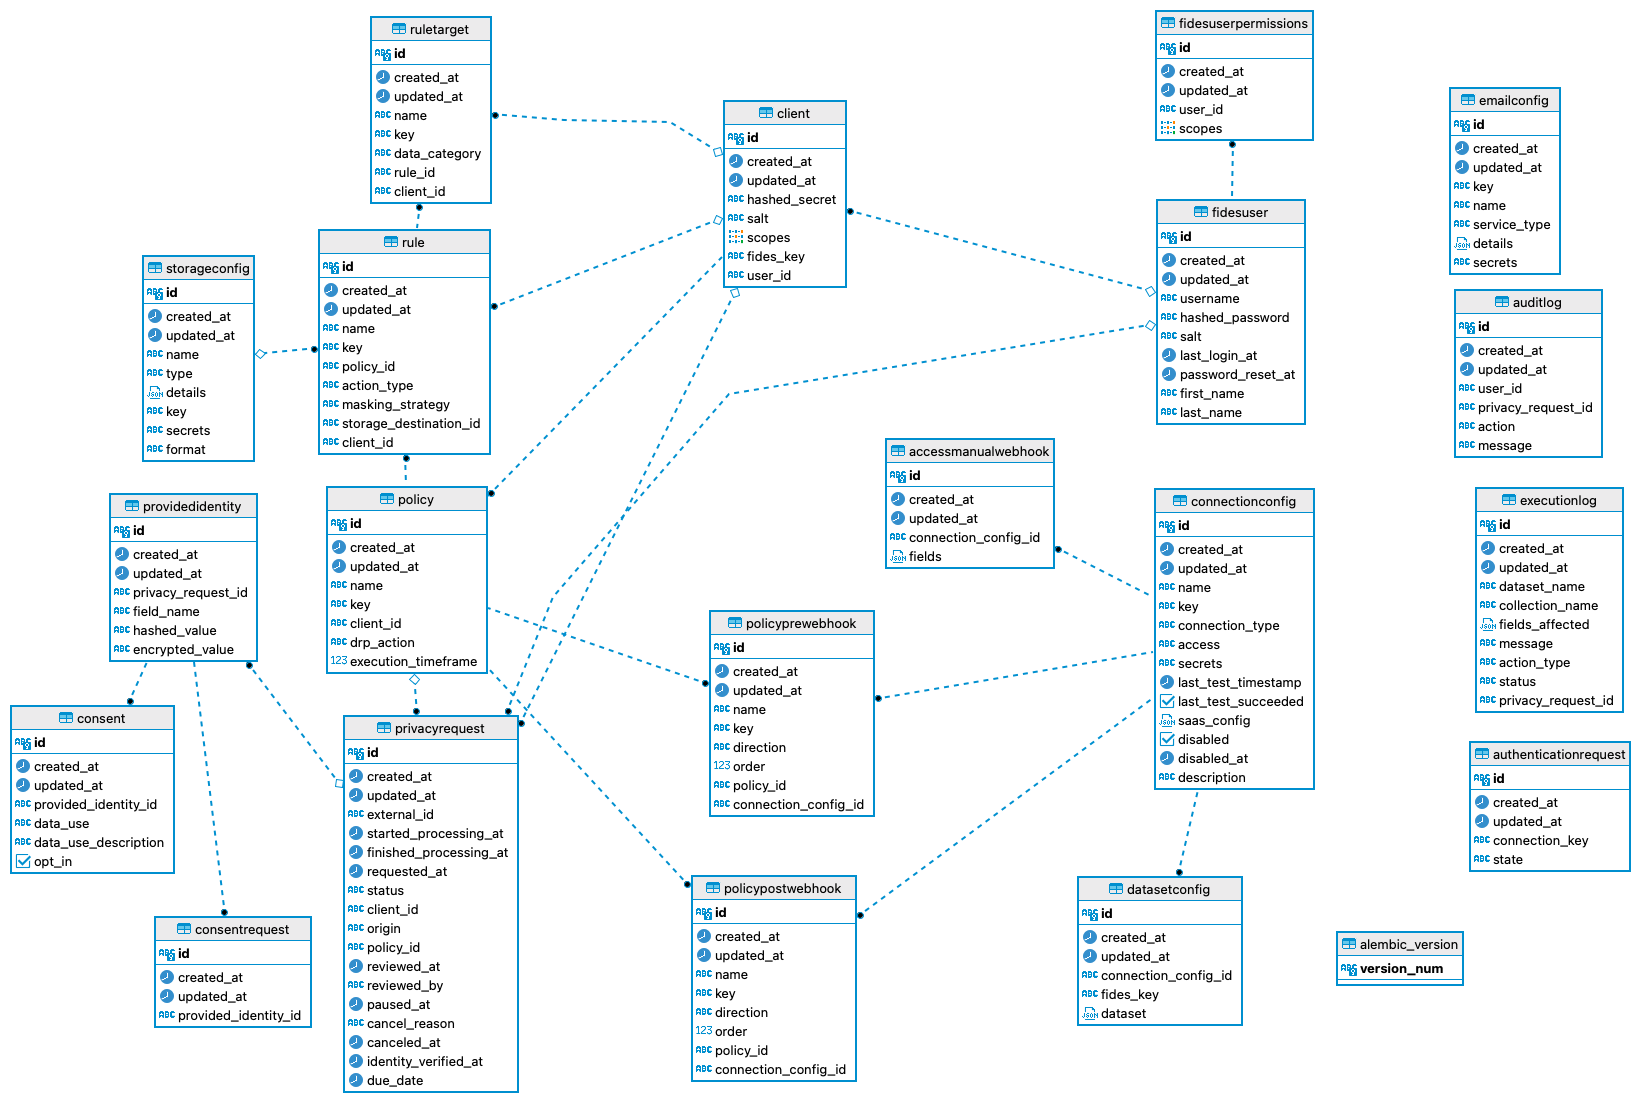
Fidesops PostgreSQL app database diagram
Step 2: Setup Hosted Cache
During privacy request execution, fidesops collects result data in a temporary Redis cache that automatically expires to ensure personal data is never retained erroneously. Any hosted Redis database will work for this purpose (Redis version 6.2.0+), from a simple Docker redis container to a managed service (e.g. AWS ElastiCache, GCP Memorystore, Azure Cache, Redis Cloud).
NOTE: Similar to PostgreSQL, there is no reason to expose this cache to the public Internet as long as it is will be accessible by your fidesops web server!
As with the PostgreSQL deployment, setting up a production-grade Redis cache is outside the scope of these docs. Once your Redis cache is available, ensure you enable a password (via Redis AUTH) to provide additional security, and then keep track of all the connection credentials as you'll need these to configure fidesops in the next step with the following variables:
| Config Variable | Example | Description |
|---|---|---|
FIDESOPS__REDIS__HOST |
redis.internal | hostname for your Redis server |
FIDESOPS__REDIS__PORT |
6379 | port for your Redis server |
FIDESOPS__REDIS__PASSWORD |
fidesopssecret | password fidesops should use to access Redis |
FIDESOPS__REDIS__SSL |
true | Whether we should enable Redis SSL |
FIDESOPS__REDIS__SSL_CERT_REQS |
required | Hostname verification. If SSL is true, the default is that it is required. |
Step 3: Setup fidesops Web Server
The fidesops web server is a FastAPI application with a Uvicorn server to handle requests. The host requirements for the fidesops web server are pretty minimal:
- A general purpose web server (e.g. for AWS EC2, a
t2.smallshould be plenty) - No persistent storage requirements (this is handled by the hosted database)
- Docker version 20.10.8 or newer (if installing via Docker)
- OR Python 3.8 or newer (if installing via Python)
Depending on your preferences, you can install fidesops in one of two ways: Docker or Python.
Install fidesops via Docker
If you typically run your applications via Docker, you'll probably be familiar with pulling images and configuring them with environment variables. Setting up a fidesops container should contain no surprises.
First, ensure that Docker is running on your host, with a minimum version of 20.10.8.
You can docker pull ethyca/fidesops to get the latest image from Ethyca's Docker Hub here: ethyca/fidesops.
1 | |
Once pulled, you can run docker run ethyca/fidesops to start the server.
To configure fidesops for your environment, however, you'll need to provide a number of required environment variables through docker run. You can accomplish this either by creating a .env file and passing it in via the --env-file {file} option or by providing individual variables with the --env {VAR} option. At a minimum, you'll need to provide the following as env variables:
| Config Variable | Example | Description |
|---|---|---|
FIDESOPS__SECURITY__APP_ENCRYPTION_KEY |
averyveryverysecretencryptionkey | AES256 encryption key used for DB & JWE encryption, must be exactly 32 characters (256bits) |
FIDESOPS__SECURITY__OAUTH_ROOT_CLIENT_ID |
fidesopsadmin | client ID used for the "root" OAuth client |
FIDESOPS__SECURITY__OAUTH_ROOT_CLIENT_SECRET |
fidesopsadminsecret | client secret used for the "root" OAuth client |
FIDESOPS__DATABASE__SERVER |
postgres.internal | hostname for your database server |
FIDESOPS__DATABASE__PORT |
5432 | port for your database server |
FIDESOPS__DATABASE__USER |
fidesops | username fidesops should use to access the database |
FIDESOPS__DATABASE__PASSWORD |
fidesopssecret | password fidesops should use to access the database |
FIDESOPS__DATABASE__DB |
fidesops | database name |
FIDESOPS__REDIS__HOST |
redis.internal | hostname for your Redis server |
FIDESOPS__REDIS__PORT |
6379 | port for your Redis server |
FIDESOPS__REDIS__PASSWORD |
fidesopssecret | password fidesops should use to access Redis |
Lastly, you'll also want to ensure you use the -p 8080:8080 option to docker run to bind port 8080 (the web server) to port 8080 on the host, so you can connect from the outside.
Putting this together:
1 2 3 4 5 6 7 8 9 10 11 12 13 14 | |
Or if you prefer to create your .env file and pass an --env-file variable, you can use the following:
1 2 3 4 | |
config.env | |
|---|---|
1 2 3 4 5 6 7 8 9 10 11 | |
Now, for most Docker hosts, you won't be calling docker run directly, and instead will be providing configuration variables to Kubernetes/Swarm/ECS/etc. As you can see in the docker run example above, this config is quite minimal and should just involve specifying (1) the image, (2) the port mapping, (3) all the various environment variables for configuration.
Note that there's no need for a persistent volume mount for the web server, it's fully ephemeral and relies on the database for all it's permanent state.
Test the Web Server
To test that your server is running, visit http://{server_url}/health in your browser (e.g. http://0.0.0.0:8080/health) and you should see {"webserver": "healthy", "database": "healthy", "cache": "healthy"}.
You now have a functional fidesops server running! Now you can use the API to set up your OAuth clients, connect to databases, configure policies, execute privacy requests, etc. To learn more, head to the How-To Guides for details.
Step 4: Setup Privacy Center (Optional)
Install the fidesops privacy center via Docker
First, ensure that Docker is running on your host, with a minimum version of 20.10.8.
You can docker pull ethyca/fides-privacy-center to get the latest image from Ethyca's Docker Hub here: ethyca/fides-privacy-center.
1 | |
Once pulled, you can run docker run -rm -p 3000:3000 ethyca/fides-privacy-center:latest to start the server.
To configure the privacy center for your environment create a project directory, i.e. ~/custom-privacy-center, and within
this directory create a config directory. Copy the config.json
and config.css into the config
directory and modify to fit your needs. More information about the configuration options can be found here.
After the configuration is updated the docker image can be run using your custom settings. From within the ~/custom-privacy-center directory (modify this
directory name to match the name you used) start the docker container:
1 | |